How to Build a Basic USB Powered Amplifier

Buy a LM386, this chip has been around for ever, is cheap, plentiful and the recommended supply voltage is 4-12VDC.

With the notch on the chip facing you and pointing up, the pinout from left to right, top to bottom is:

LM386 Pinout

Pin 1 : Gain Pin 8 : Gain
Pin 2 : Input – Pin 7 : Bypass
Pin 3 : Input + Pin 6 – Voltage Supply
Pin 4 – Ground Pin 5 – Voltage Out

To get some sort of sound going, you’ll need the following:

  • 10ohm resistor
  • 10kOhm resistor
  • 0.05uF capacitor
  • 250uF capacitor

All of the above information can be found on the Texas Instruments LM386 datasheet, very handy!
How to Setup an Email Address from My Own Domain?

Make sure that your hosting plan covers email hosting. If you do, somewhere in the interface of your hosting package will show IMAP and/or POP3 server settings.

This example will cover Godaddy domain registrar and Ionos (formerly 1and1) web hosting provider. Your specific situation will likely be similar enough for this to be useful. Just substitute your favourite web host and domain registrar.

  • First, you’ll need your own domain such as: WilsonHui.com from your domain registrar (Godaddy)
  • Set your web host (Ionos) to accept requests from your domain (wilsonhui.com)
  • Log in to your domain registrar (Godaddy) and set the DNS name servers to entries provided by your web host (Ionos).
    At this point, visiting your domain (https://wilsonhui.com) in a browser should show what you’ve uploaded to your web host (Ionos).
  • Setup an email address with an actual inbox with your web host (Ionos). You don’t want just a forwarding email address. You’ll be asked to enter an email address (wilson@wilsonhui.com) and a password (not password)

*Optional: If you want to use Gmail as your primary email interface, you can now set that up.

  • Create a Gmail account
  • Go to your web host (Ionos) and forward your emails to your Gmail email address
  • At this point, emails sent to wilson@wilsonhui.com will be received in your Gmail inbox.

You can take it a step further and send emails from your new email address (wilson@wilsonhui.com) from Gmail.

  • Log into Gmail and go to Settings
  • Go to Accounts and Import
  • Click Add another email address
  • Enter the SMTP email server settings from your web host (Ionos)Note: This is why you needed an actual email account and not just a forward.

That’s it, you should now be able to receive emails from your own custom domain and send from that address using Gmail.

Battery Cover for Crystal IS33 Pressure Calibrator

I see quite a lot of Crystal IS33 pressure calibrators from customers with broken or missing battery covers and so I thought I would try my hand at 3D printing since I’ve never done it before and the idea of it sounded VERY interesting to me.

Precise measurement is very important when designing something so small. The little tabs that always break are under 1mm thick. Luckily, you can get a decent enough digital caliper for not too much money at Canadian Tire or Princess Auto.

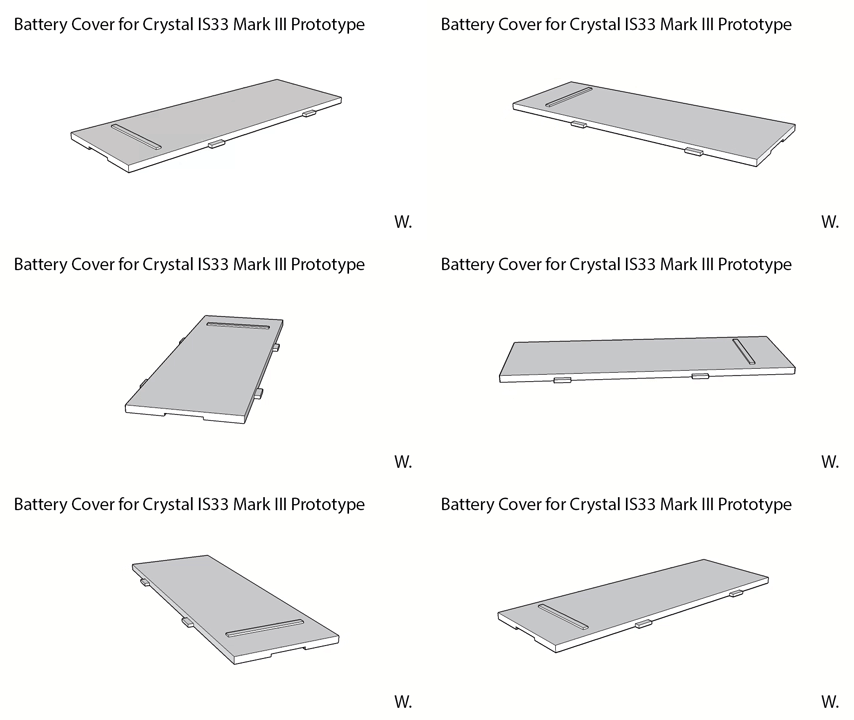
Battery Cover for Crystal IS33 Prototype

I started with measurement of the large basic rectangle shape and then measured the dimensions and position of the four little tabs that holds the battery cover in place. I tried to incorporate the small intricacies of a trapezoid shape of the little tabs, but that was reduced to a simple rectangular prism in the final version. Between the second and third attempt, I added channels on the underside of the battery cover to allow clearance for the two screw holes. I’ve always thought that the grip ribs were on the wrong side of the battery cover for opening, so I moved it to the other side.

Overall, it took three attempts to get a working battery cover that fits the IS33 pressure calibrator perfectly. Not bad for my first experience with 3D printing I think.

3D Printed Battery Cover for Crystal IS33

How to Use the Sunny 16 Rule

Aperture f/16 use shutter speed of 1 over ISO on a bright sunny day, that’s the basic jist of the Sunny 16 Rule.

Conditions Settings
Sunny ISO 100 f/16 1/100s
Slight Overcast ISO 100 f/11 1/100s
Overcast ISO 100 f/8 1/100s
Heavy Overcast ISO 100 f/5.6 1/100s
Shade ISO 100 f/4 1/100s

Back in the day, camera lenses had clicky aperture stops and the Sunny 16 Rule corresponds to these stops.
The common aperture stops were f/1.0, f/1.4, f/2.0, f/2.8, f/5.6, f/8, f/11, f/16 and f/22.
We need to compensate 1 stop for each change in light conditions. Bright sunny conditions have sharp, well defined
shadows. Slight overcast has soft shadows and overcast barely has any shadows from the Sun. Compensate 1 stop for
backlit or snowy (bright white) situations.

I shoot my Canon 6D DSLR like I shoot slide and still use the Sunny 16 Rule. To keep shutter speed up and lens sharp,
my most commonly used settings are based on ISO 200 f/8 1/800s.

How to Get Started with Arduino

Buy the Arduino UNO (R3 at the time of this writing). This is the “most standard” version of the Arduino that I’ve come across. The Arduino IDE works perfectly via USB and most shields that you come across will be physically and electronically (5V logic) compatible. I would start with the Arduino UNO R3 to develop on and then get a smaller or more energy efficient version when finalizing a working prototype.

The classic lighting of a LED connected with a 220Ω resistor is always a great way to start. But I think a great first project that will cover the basis of A LOT of future projects is to read input from a sensor of some sort and then output a value to a LCD display.

As a first project, I would recommend a simple, but useful temperature and humidity read out, a thermo-hygrometer with a basic 16×2 LCD display. It’s easy to be overwhelmed by all the various concepts involved when starting with electronics, but you really don’t need to understand too much to get something working. You can always dive deeper once you get a few projects under your belt.

Materials

  • Arduino UNO R3
  • Breadboard
  • 4x AA battery holder or similar 5V power supply
  • Temperature and humidity sensor DHT11
  • 16×2 LCD display