Bow River Fishing

The Bow River that flows through Calgary from the Rocky Mountain glaciers is supposedly a world class trout fishery. I’ve been trying my hand at fishing this beautiful river. Here are my favourite spots to try and fish the Bow River in and around Calgary Alberta.

Site Spring Summer Fall Winter
Refinery Park Too shallow;
No fish here
Beaver Dam Flats
Graves Bridge Maybe;
Didn’t see anyone catch fish
Carburn Park Maybe;
Didn’t see anyone catch fish
Sue Higgins Park Maybe;
Didn’t see anyone catch fish
Ivor Strong Bridge Caught fish here!
Fish Creek
Mallard Point
Douglasdale Maybe;
Didn’t see anyone catch fish
Fish Creek
Bankside
Too shallow;
No fish here
Fish Creek
Bow Valley Ranche
Saw someone catch fish Saw someone catch fish Too steep
Fish Creek
Hull’s Wood
Fish Creek
22X
Maybe;
Didn’t see anyone catch fish
Saw someone catch fish
Fish Creek
Rotary Park
Saw someone catch fish
Cranston
Policeman’s Flats Maybe;
Didn’t see anyone catch fish
Mckinnon Flats
Legacy Island
Johnson Island Maybe;
Didn’t see anyone catch fish

How to Use a Multimeter

A multimeter is the most useful tool when dealing with electricity. A cheap $15 multimeter will go a long way and is likely all that you’ll need. In general, anything fancier/more expensive just increase accuracy and adds very specific functionality that you are unlikely to ever use.

How to Measure Voltage

Voltage is probably the most common measurement you’ll make. Whether you’re checking batteries or wall sockets, voltage is what you’re looking for. Your multimeter will have a voltage setting and either separate settings or a toggle button for AC and DC voltage. You’ll need to know if you’re dealing with AC or DC.

Check Batteries with Multimeter

  • Set your multimeter to DC voltage
  • Connect the red test lead to the multimeter voltage input
  • Connect the black test lead to the multimeter common input
  • Connect the other end of black test lead to battery negative (-) terminal
  • Connect the other end of red test lead to battery positive (+) terminal
Battery Type Normal Voltage
AA, AAA, C, D Alkaline Battery 1.5VDC
AA, AAA, C, D Rechargeable NiMH Battery 1.2VDC
Car Battery When Off 12VDC
Car Battery When On 13.5VDC ~ 14.5VDC

*Note: Consider replacement or charging if battery is below the above values.

Check Wall Sockets with Multimeter

  • Set your multimeter to AC voltage
  • Connect the red test lead to the multimeter voltage input
  • Connect the black test lead to the multimeter common input
  • Connect the other end of red test lead to one side of wall socket
  • Connect the other end of black test lead to other side of wall socket

*Note: Don’t worry about the bottom middle prong (ground in North America). Polarity does not matter for AC voltage measurement. You should be seeing ~120VAC on a normal wall socket (not special washer/dryer sockets) in North America.

How to Measure Resistance

Resistance measurement is very useful for testing wires / cables and is the second most common measurement I make. If a wire is good, resistance will be very low, if it’s bad or disconnected, resistance will be very high. A decent multimeter should have a “continuity” function. This feature will cause the multimeter to audibly beep if resistance is very low. If your multimeter doesn’t have a continuity function, then just read the numbers on the resistance setting. I would consider anything under 100 ohms low for wires.

Check Wiring with Multimeter

  • Set your multimeter to resistance
  • Connect the red test lead to the multimeter voltage / resistance input
    I have not encountered any multimeter where resistance input isn’t shared with voltae
  • Connect the black test lead to the multimeter common input
  • Connect the other end of red test lead to one end of wire
  • Connect the other end of black test lead to other end of wire

How to Measure Current

I can think of no practical reason why someone looking to learn the basics of multimeters and electricity should measure electrical current.

  • Set your multimeter to AC / DC current depending on application
  • Connect the red test lead to the multimeter current input
  • Connect the black test lead to the multimeter common input
  • You will need to connect the multimeter inline with whatever circuit you’re trying to measure current for.
    e.g., you may need to disconnect something, put red lead on one end and the black lead on the other.
    If you’re learning the basics of multimeters and electricity, I do not recommend current measurement and I see no need for it. Personally, I use current measurement to determine load when tinkering with electronics. It helps me figure out if my power supply is suitable and how long I can run something.

Basics of Electricity

This is meant to be a basic introduction to electricity / electrical concepts for those who have limited or no electrical background.

V=IR

Where:
V = Voltage (measured in volts V)
I = Current (measured in amps A)
R = Resistance (measured in ohms Ω)

The above equation is Ohm’s law and should get you through most of what you need to know. In terms of an analogy, if electricity is like water flow, then voltage would be like pressure (differential), current like flow and resistance like the size of pipe. In practical terms, resistance is probably determined for you and the thing you have most control of is likely voltage.

Resistance

Everything has resistance, just a matter of how little or how much. Something with low resistance (low ohms) will allow electricity to flow more freely than something with high resistance (high ohms). To go with the water flow analogy, resistance is like size of pipe. A larger pipe will have lower resistance allowing higher flow while a smaller pipe will have higher resistance restricting flow.

Voltage

Voltage is the potential difference between two points. In order for electricity to flow, there needs to be a difference in voltage between two points. When measuring battery voltage with a multimeter, you need to put one probe on the positive terminal and one probe on the negative terminal. If you place both probes on the same terminal, you’ll see 0 volts. The higher the voltage (volts), the more dangerous something is and the further you should stay away. Like differential pressure, the higher the pressure (voltage), the more flow (current) it will allow up to a certain point – determined by pipe size (resistance).

Current

Current is the flow of electricity measured in amps (amperes). For practical intents and purposes, current is the result of adjusting voltage given a fixed resistance. In the water flow analogy, current (flow) is the end result of changing the pressure (voltage) by opening or closing a valve like a faucet that’s connected to a hose (resistance). If you want to increase flow, you don’t start by changing out the hose, you go and turn the knob to increase pressure. But at some point, if you have a tiny hose hooked up to a fire hydrant, the flow and pressure will cause the hose to fail. Electrical current is somewhat like that, you can increase current by increasing voltage and too much current on a given wire will destroy it.

I=V/R

If we rearrange the equation for current, we see that as resistance gets bigger (dividing by a larger number), current decreases and as resistance gets smaller (dividing by a smaller number), current increases. This equation (Ohm’s law) is very useful when looking at the relationship between the basic components of electricity, if any of these things go to 0, the whole thing just doesn’t work and there’s no electricity flowing. For example, as resistance gets towards 0, current increases, if you connect positive terminal to negative terminal directly without any load in between, you’ll have a short circuit and a lot of current flowing. Things will heat up and fail, some times in spectacular fashion.

Breaking Things

You can break things by supplying too much voltage and you can also break things by having too much current. The two are related and increasing voltage will increase current as well given a fixed resistance.

What Now?

After learning about voltage, current and resistance, I would learn how to use a multimeter and maybe try some things out connecting batteries and LEDs.

How to Clone a Hard Drive

I’ve been using Clonezilla a number of years whenever I want to clone a hard drive. The point of cloning a hard drive is to create a complete backup so that if things go sideways I have a way to restore to what I had before. I clone hard drives when I upgrade to a larger size or when I do a big software update like moving from Windows 7 to Windows 10. Cloning a hard drive allows me to keep all the software settings and applications installed as opposed to trying to remember which individual files are worth backing up and copying just those. The backup clone will also allow me to boot into Windows or whatever OS happens to be on the hard drive. Hard drive cloning can be rather time consuming, but if you want a complete restoration that allows you to boot and keep everything (applications and data files), it might actually be the quickest way. Just try and restore from “the cloud” if something goes wrong. It wouldn’t surprise me if it’ll take days if you can even restore in such a way. Local physical hard drive is still the way to go if you want fast recovery.

Create Bootable USB Drive

There are several ways to run Clonezilla and getting it into a bootable format, I currently like using Tuxboot to create a bootable USB key.

Download Tuxboot

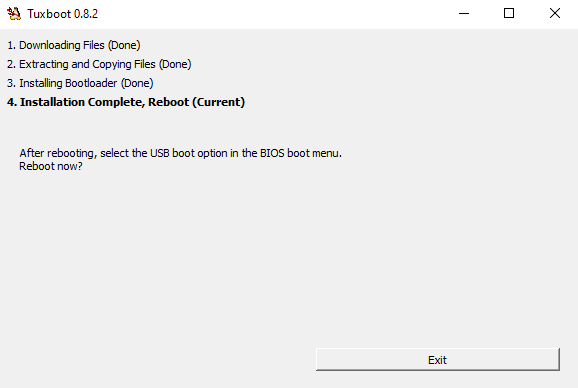
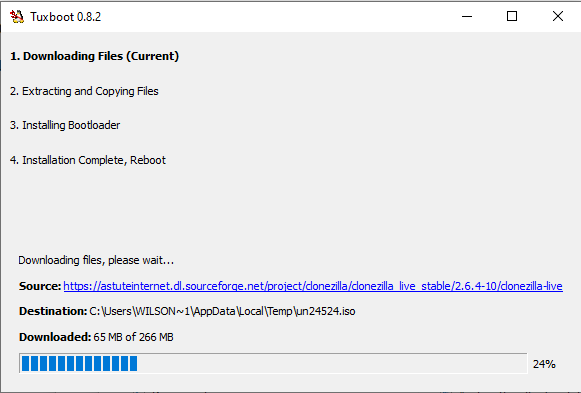
Download and run Tuxboot
https://tuxboot.org/download/


Just click OK to create bootable USB key with Clonezilla
Connect the Hard Drives

You can create the USB key from any computer and you can also use a spare machine to do the actual cloning if the machine you’re trying to clone / backup doesn’t have a way for two hard drives to be connected physically at the same time.

Boot into Clonezilla Menu

This part can be tricky for some users, but that is beyond the scope of this article and I can’t help much. It is dependent on your specific machine BIOS / UEFI. You’ll need to find away to boot into the newly created USB key instead of the usual hard drive already installed. You may need to turn off Secure Boot if using UEFI. It might be as simple as bringing up the boot menu and selecting the USB key. Good luck!

Run Clonezilla

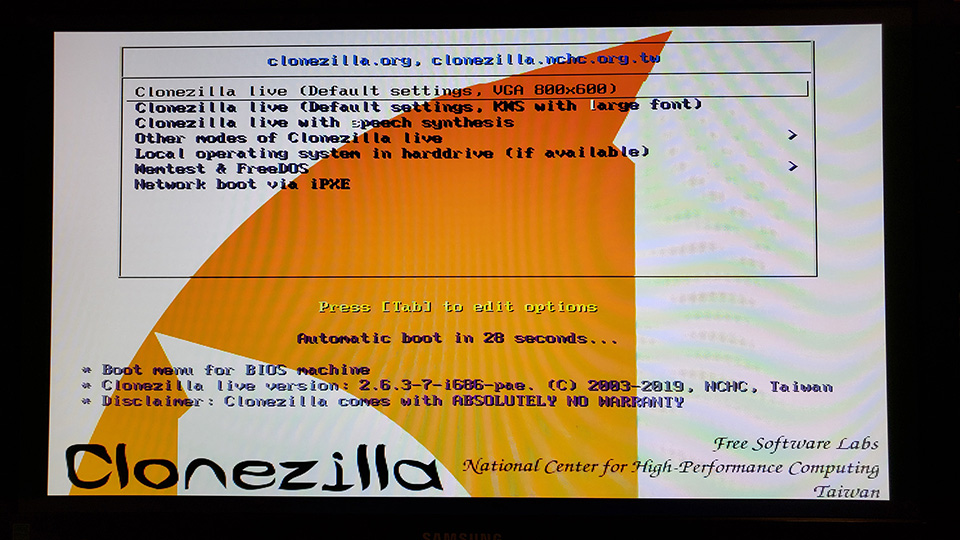
If you managed to get to the Clonezilla boot screen, then congratulations! If should be fairly straightforward from here. The top option usually works for me: Clonezilla live (Default settings, VGA 800×600)
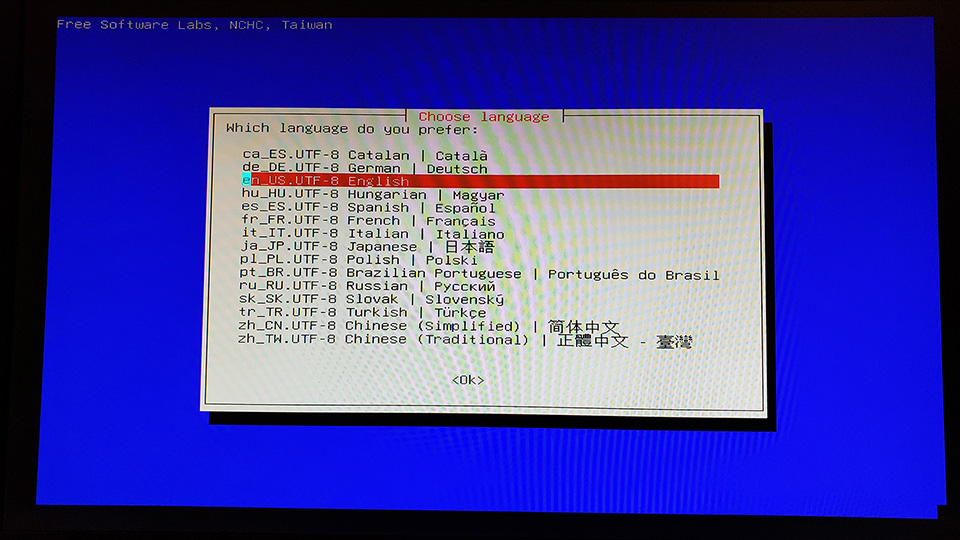
Choose a language, I prefer English. For those not familiar with DOS-like screens, you may need to press the [TAB] key to get to the <Ok> button and use the keyboard arrows to navigate. Press the [ENTER] key to continue while <Ok> is highlighted.
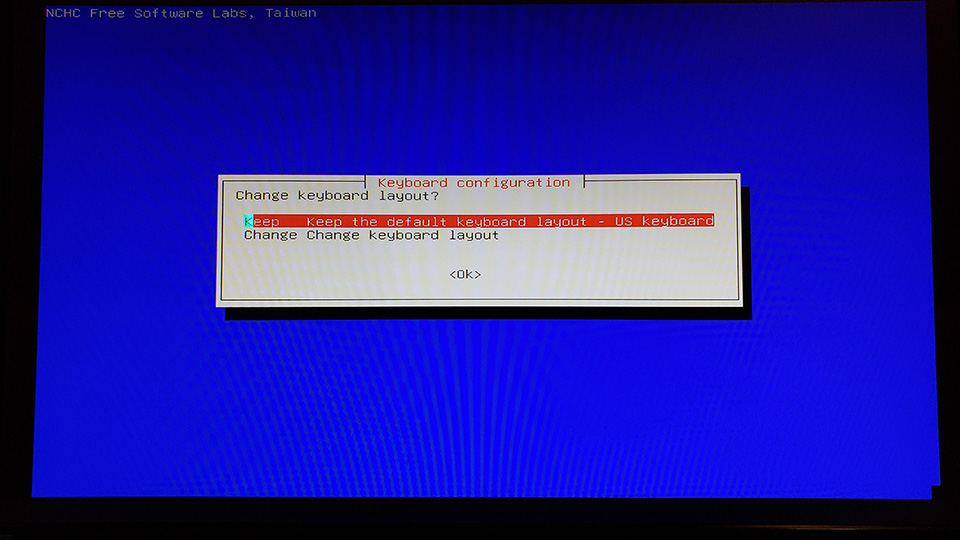
I’ve never tried to change keyboard layout and have always just left it as the default.
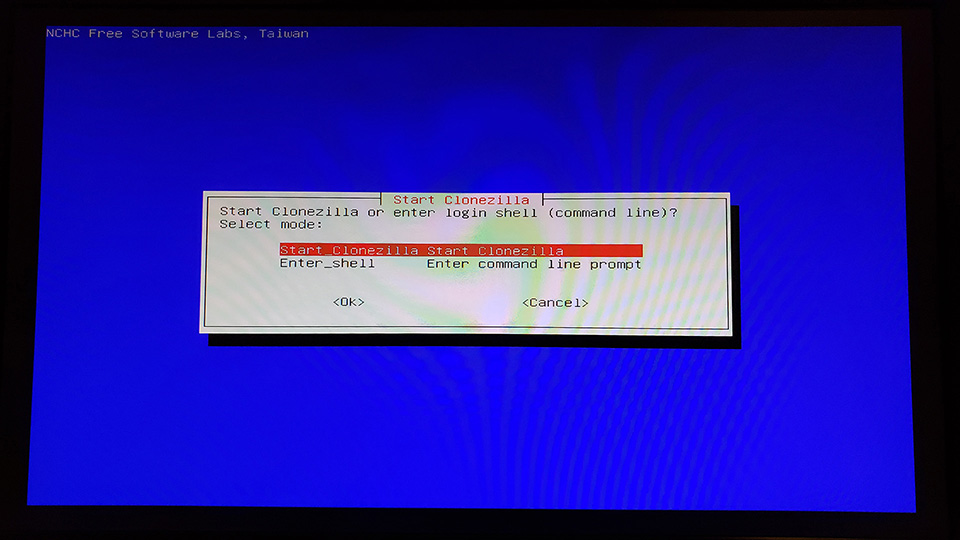
I like Start_Clonezilla as it pretty much just walks you through the process.
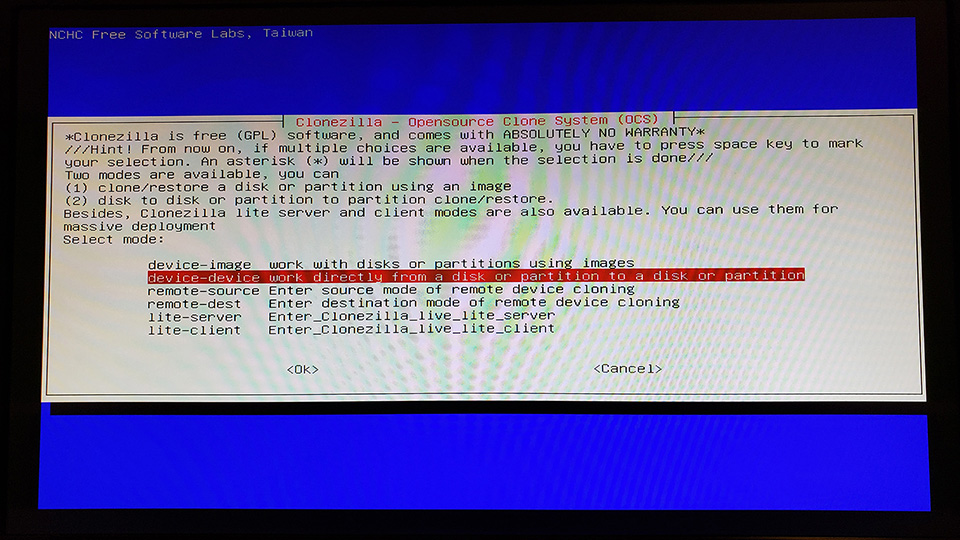
In this example of cloning hard drive to hard drive, select device-device.
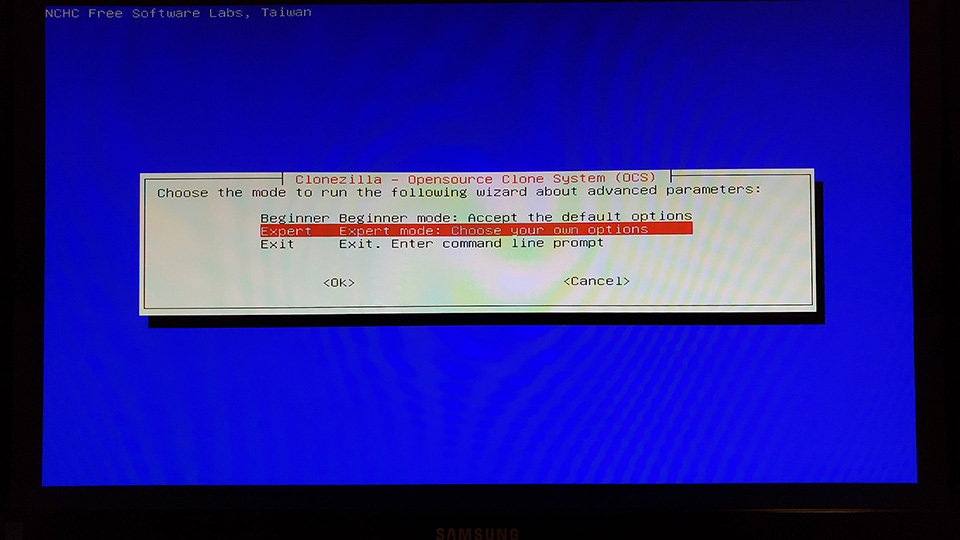
Select Expert mode, we need that for the create-partition-table-proportionally option.
In this example of cloning hard drive to hard drive, select disk_to_local_disk.
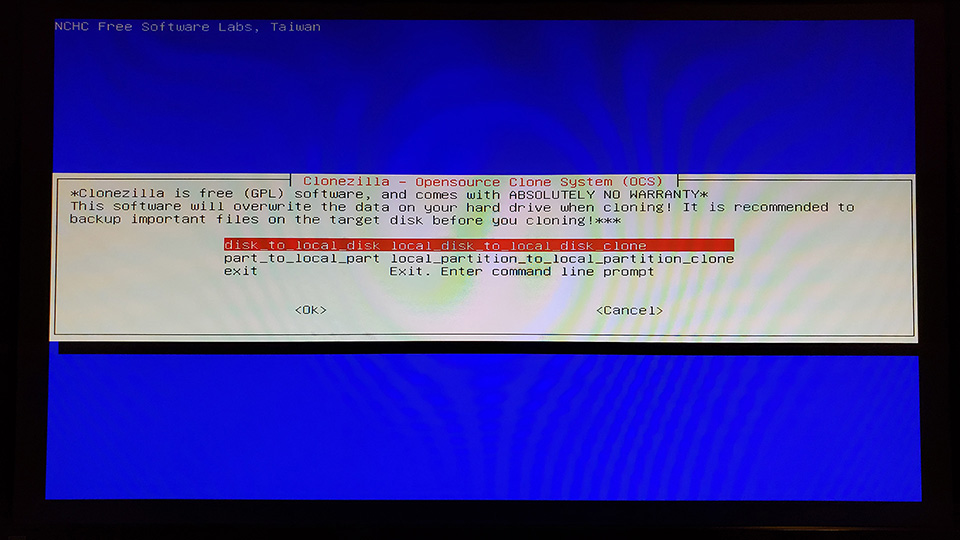
Select the SOURCE disk that you would like to copy FROM.
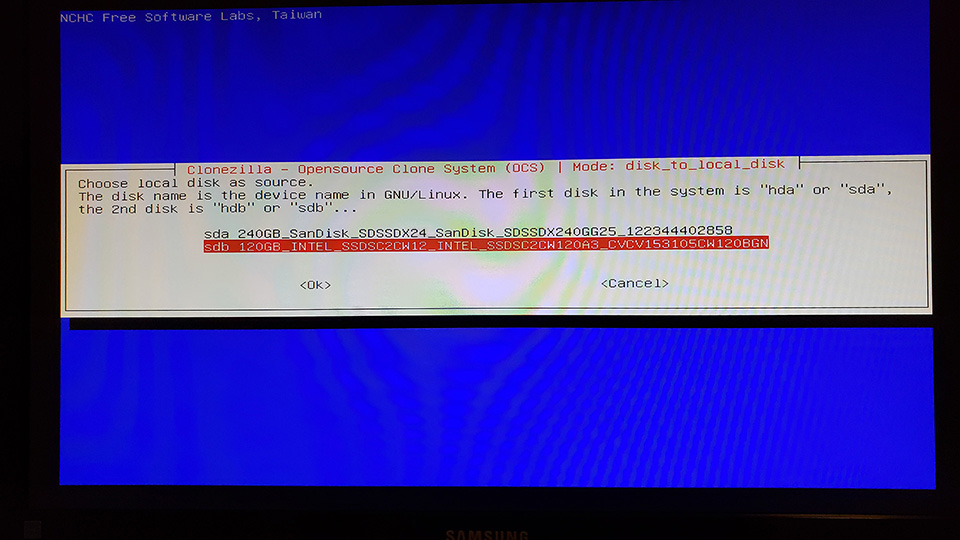
Select the TARGET disk that you would like to copy TO.

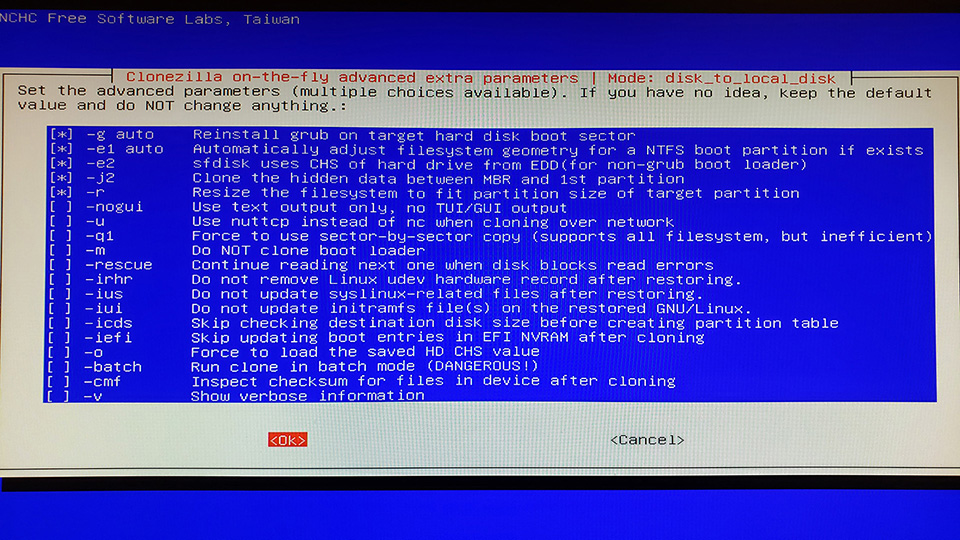
The default advanced parameters on this page are good and I haven’t had to change them.
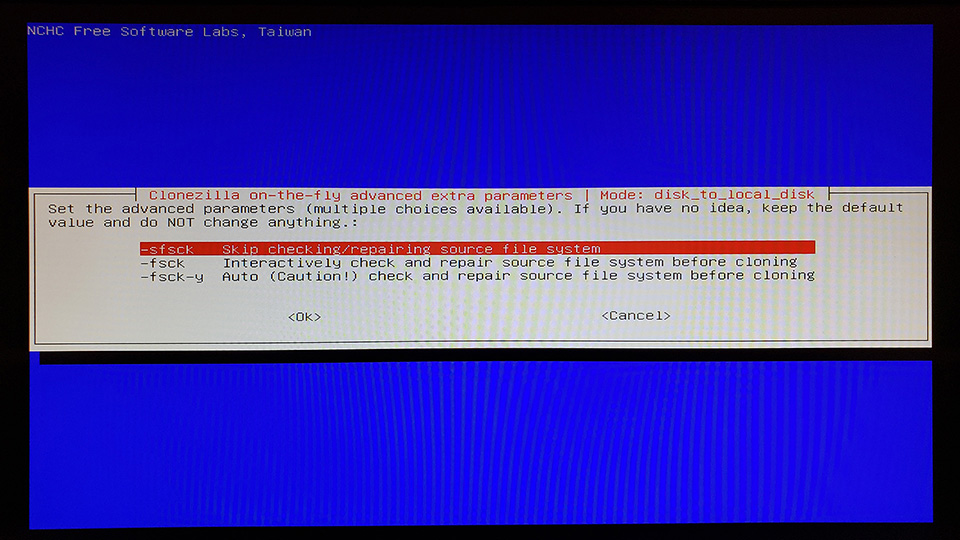
I select sfsck and skip fsck when cloning in the interest of time. I do however try to boot from and make sure the backup drive works first before messing with the original drive.
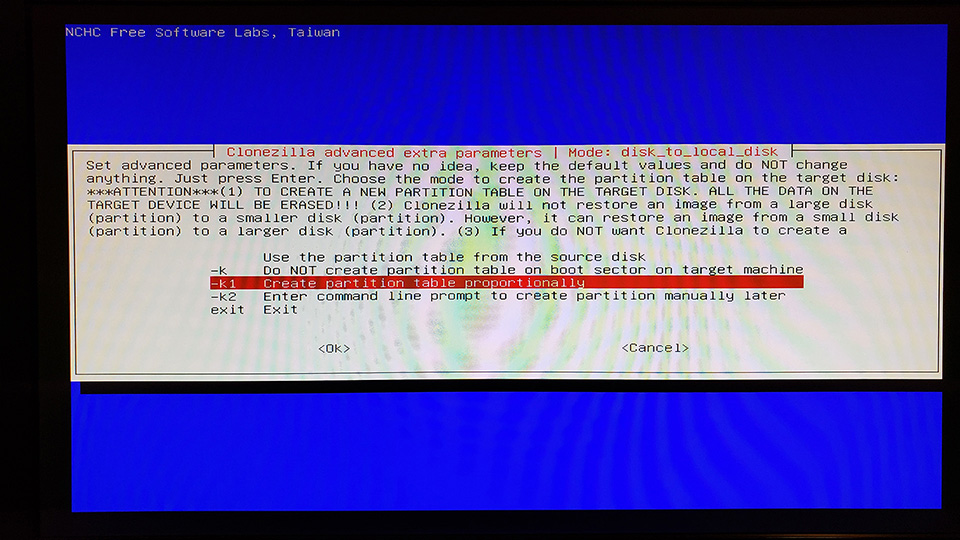
-k1 is what we need to create partition table proportionally. This is a very important setting when upgrading to larger hard drives and makes the new extra space usable as one big drive.
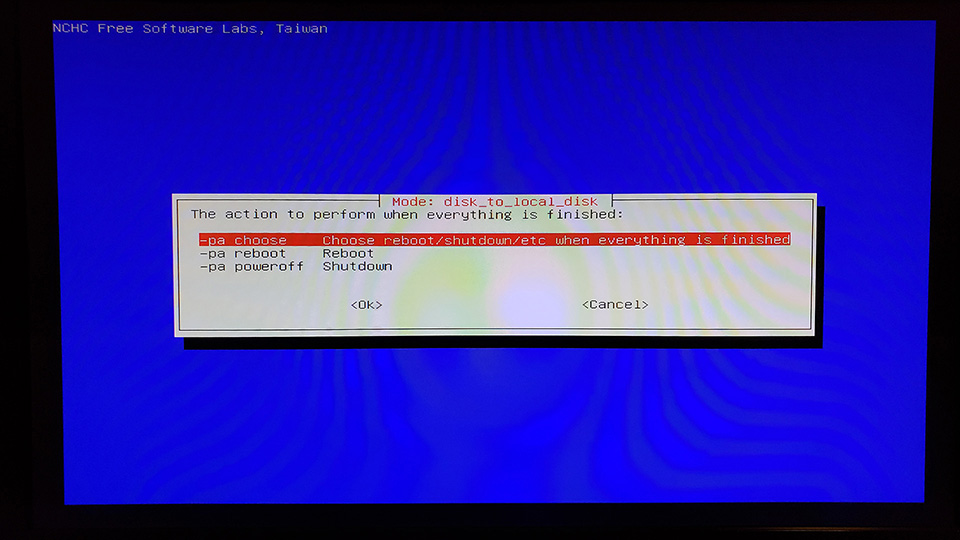
I like -pa choose so that I can later choose what happens when cloning is completed.
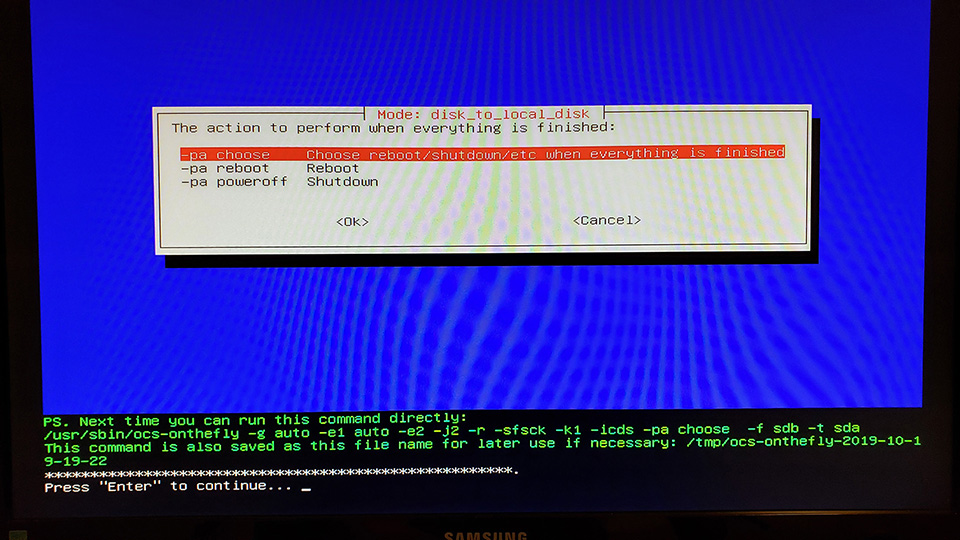
Finally, the settings are done, you can write this command somewhere if you feel like saving the exact command to run in the future. I would just refer back to this guide.
Check the TARGET hard drive. EVERYTHING on the TARGET hard drive will be LOST.
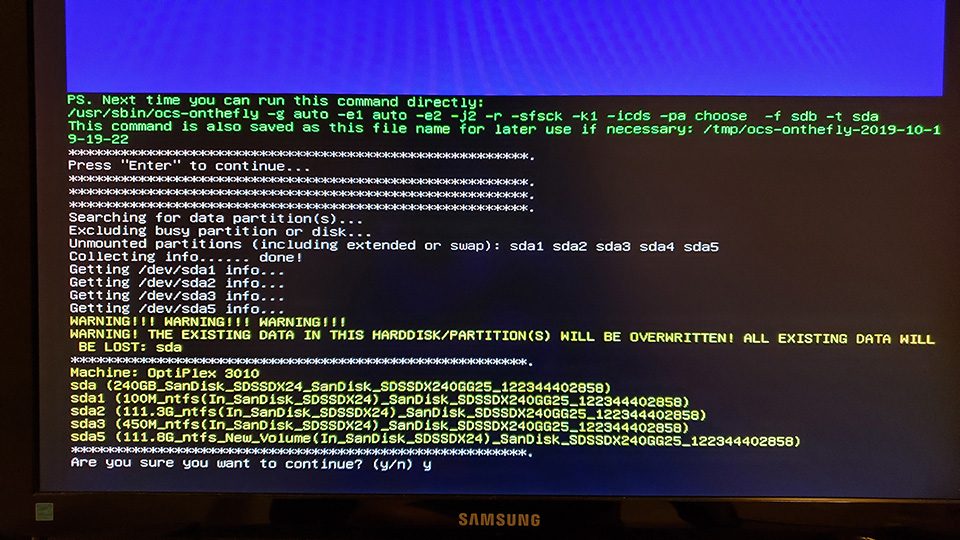
Last chance to double check the TARGET hard drive. EVERYTHING on the TARGET hard drive will be LOST.
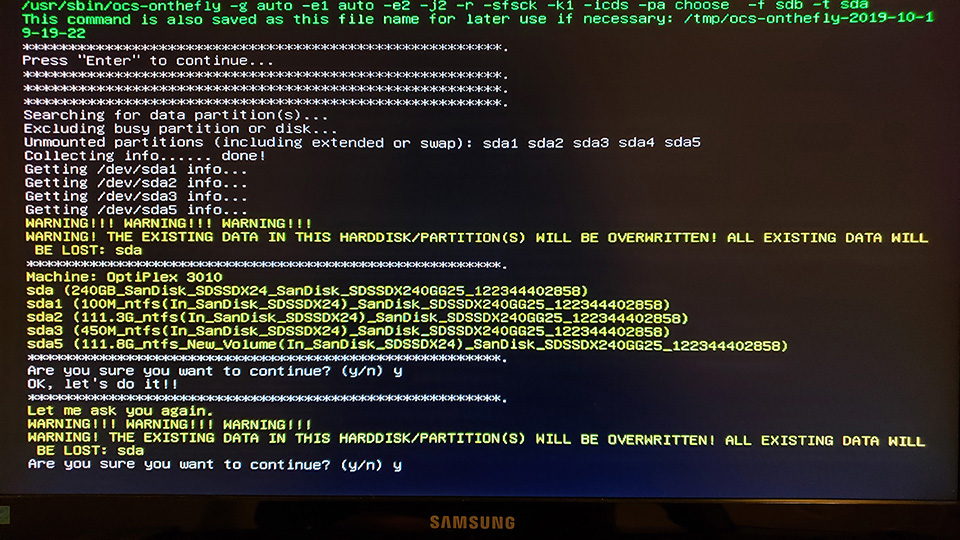
I just say yes to cloning boot loader as I’m usually dealing with single hard drive machines and want the target hard drive to boot.
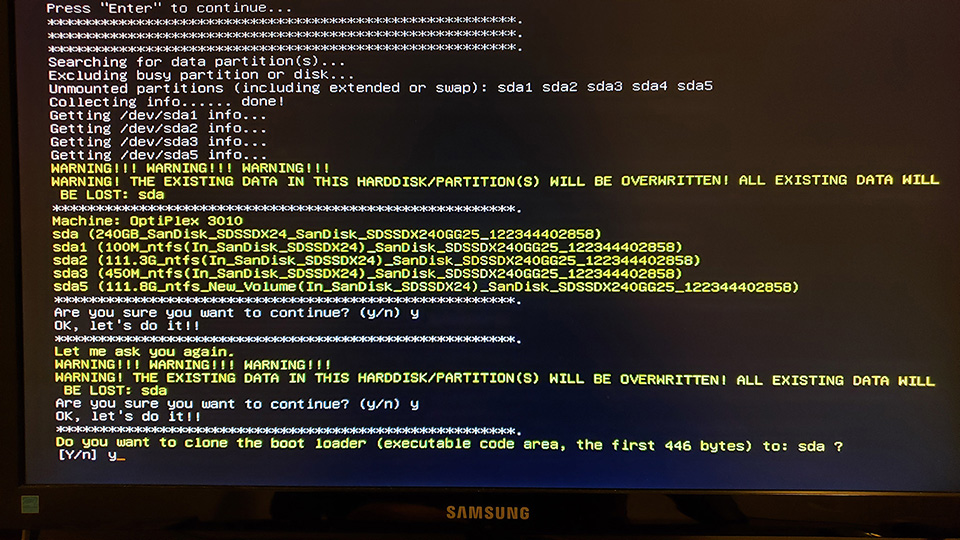
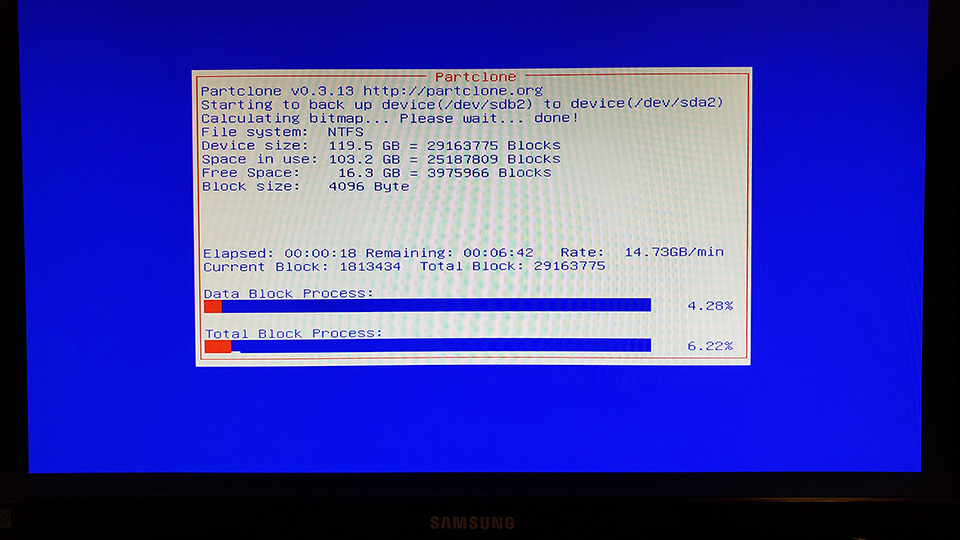
We’re in business! The cloning progress is finally underway.
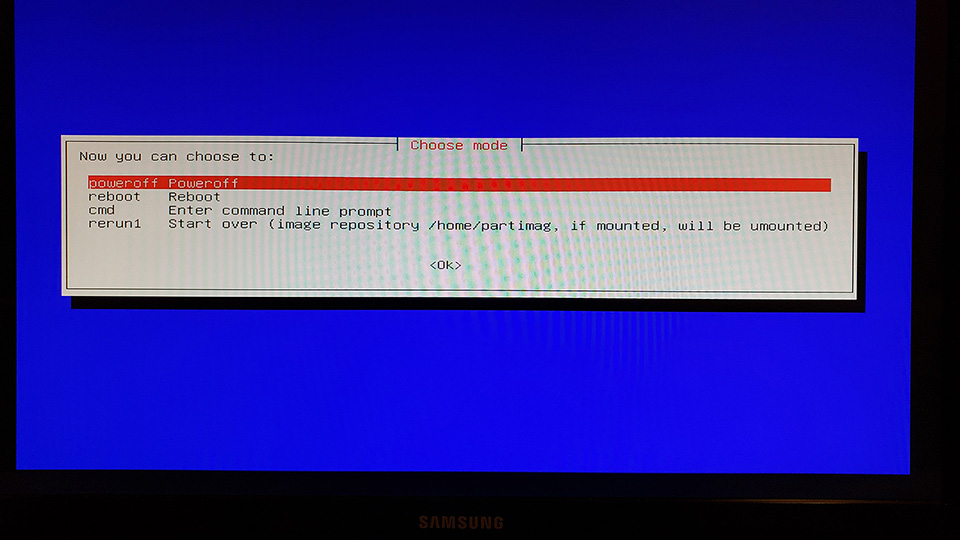
Once the cloning process is complete you should have a working copy of all the stuff (data and applications) as before. I like to shutdown the computer, unplug the USB key and make sure the TARGET hard drive boots and runs fine. Depending on what you’re doing e.g., migrating to a replacement hard drive or doing a major software update. This might be where the cloning process ends. DONE!
How to Get Started with LED

Connect a LED with a battery and a resistor. The long leg of an LED is the positive, the anode. You could connect a LED directly to a battery without a resistor, but that probably wouldn’t last very long. The resistor acts as a load and limits the amount of current in the circuit. When just starting out, you don’t need to worry about the technical details, just know that it’s best to add in a resistor when wiring a LED. For my example, I’ve chosen a ~5VDC power source (3x AA batteries, 4x AA batteries would have worked just as well) and a 220Ω resistor. Resistor voltage and power ratings aren’t important for this example, any ~200Ωish resistor will do. I like the battery holders with a builtin power switch. The type of LED shown here are 5mm through-hole (THT). Should be pretty common in electronics/hobby shops. They might even have these at RadioShack/The Source.

Connect One LED

This is how I would connect a single LED to something. The white plastic rectangle is a full-sized breadboard. It allows quick electrical connections without the need to solder or mess with alligator clips or electrical tape. Great for testing and experiments. Using just regular AA batteries and simple components, don’t be afraid to just connect things and see what they do. You won’t do too much damage. Maybe just don’t short the positive and negative of the battery together and continue to hold it in your hand. If you do want to short a battery, do so and toss it away from yourself.

  • POSITIVE of battery goes to POSITIVE of LED
  • NEGATIVE of LED to one end of resistor
  • Other end of resistor to NEGATIVE of battery

Connect Multiple LEDs

Connect Multiple LEDs in Series

I think most common strings of battery powered LED Christmas lights are wired this way with multiple LEDs connected in series with a single resistor. You may need to increase voltage or lower resistance depending on how many LEDs you’re connecting together. If one LED burns out, none of the other ones will light up.

  • POSITIVE of battery goes to POSITIVE of Green LED
  • NEGATIVE of Green LED to POSITIVE of Red LED
  • NEGATIVE of Red LED to one end of resistor
  • Other end of resistor to NEGATIVE of battery
Connect Multiple LEDs in Parallel with Separate Power Connections


This is the most robust way to wire multiple LEDs together. Individual burnt LED or resistor won’t affect the lighting of the others. Also make note of the brightness of the two LEDs compared to the previous connection where they were connected in series. If space and budget allows, this is what I would do for my projects where appropriate.

  • POSITIVE of battery goes to POSITIVE of Green LED
  • NEGATIVE of Green LED to one end of resistor #1
  • Other end of resistor #1 to NEGATIVE of battery
  • POSITIVE of battery goes to POSITIVE of Red LED
  • NEGATIVE of Red LED to one end of resistor #2
  • Other end of resistor #2 to NEGATIVE of battery
Connect Multiple LEDs in Parallel with Shared Power Connection

  • POSITIVE of battery goes to POSITIVE of Green LED
  • NEGATIVE of Green LED to one end of resistor
  • Other end of resistor to NEGATIVE of battery
  • POSITIVE of battery goes to POSITIVE of Red LED
  • NEGATIVE of Red LED to one end of resistor
  • Other end of resistor to NEGATIVE of battery

This is a middle ground between redundant everything and space constraints. As you can see, there are multiple ways to achieve the same end result (lit LEDs in this case).

There are many more related topics that you can dive deeper into, but this should get you started with LEDs and electronics in general. Enjoy!